Intro
This section is still at the stage of filling with content... Please be patient:)
Most of functions are simple and clear enough, so we will not be describe everything. For now we add documentation for elemets and functions which can be a little complicated.
If something not clear for you ask a question in comment here and we add it first.
Header
Header is a compound section which includes topbar(can be disable), navigation bar(navbar) and lots of OK Elements incloding logo(it's an element too)
As the header section is most important part of design we did it full customizable both for Pro and Free versions, and you easy can change it within a couple of minutes.
Header Elements
Except the topbar and navbar elements The header has 3 own elements(you can select from list which you need). They have some alignment settings, below you can see the simple scheme of header and you can play with it to understand what settings options mean(no page reload).
Alignment
See the Pen Block's Layouts by Alexander Green on CodePen.
Element Width
See the Pen Block width using flexbox by Alexander Green on CodePen.
Element Width - two elements
See the Pen Block width using flexbox(2 elements) by Alexander Green on CodePen.
OK Elements
OK Elements are the various blocks with the different elements which usually are used in User Interface of the site. Depending on position they differ and can be module position, logo, search form, email etc. The reason to use them insted of static blocks is the layout scheme became the very flexible, and you can easy swap them or disable.
Element settings.
All elements are grouped in the Element Layout section(menu item) for better management. But keep in mind - elements have the settings which are in sidebar menu , Elements Layout have options to select only.
For Example
Header elements have the animation settings which are in the header section, telephone and email elements settings are in the "Tel/Email" section etc.
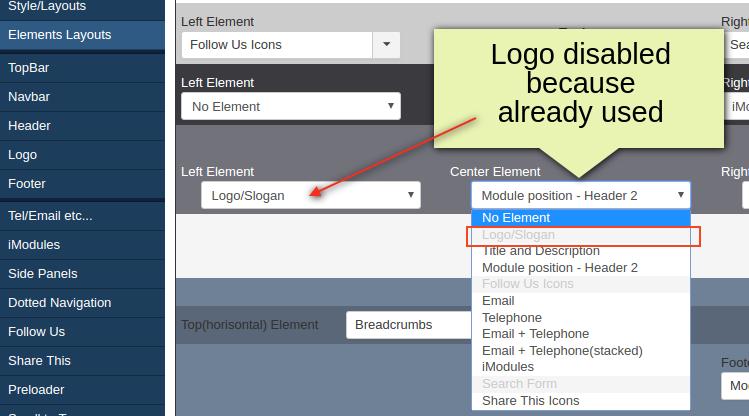
Note: To avoid to have double elements in the same area, we did a function to block element selection.
So, for example if you want to select the logo but the option is disabled, means it already used and you need to unselect in in another position(do no element), and then the logo element will be available for selection(see screenshot).
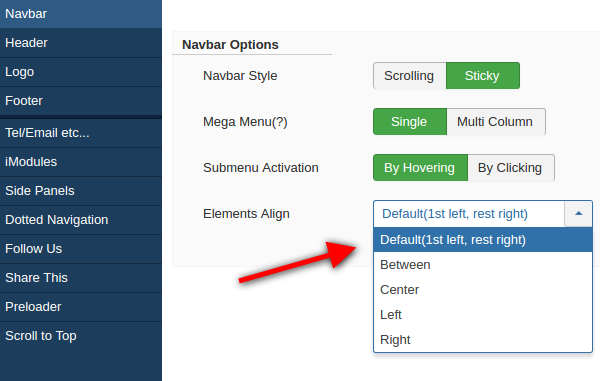
Navbar
You can select one of element alignment.
There's below just a simple live sheme of the element alignment... of course it's just to see, and it's wrong and will be corrected later
See the Pen Menu Sample Demo by Alexander Green on CodePen.
Main Menu(module position menu)
1. Two Dropdown Effects
By default submenu drops down when you mouse hover the parent(level 1) menu item, but alternatively you can switch it by clicking only. It's good if you have lot's of submenu items in a few columns.
2. Multicolumn drop-down menu
You can arrange your submenu items(drop-down) dividing them in few columns. All you need is activate this option in navbar section and then to arrange them in columns.
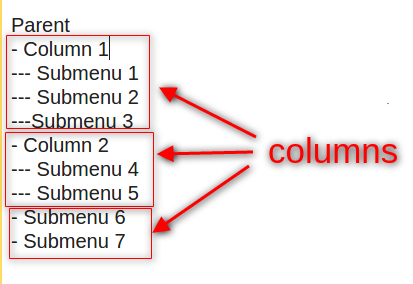
Here you need to remember a few things
All items of 2nd level are submenu items
To make from them a column you should do 3rd level.
Quick way
For example you have the following structure
Parent
- Submenu 1
- Submenu 2
- Submenu 3
- Submenu 4
- Submenu 5
- Submenu 6
- Submenu 7
- Submenu 8
You should add two new menu item(they can be dummy, as they wll be column headers/deviders - system link, separator or heading) - Column 1, Column 2
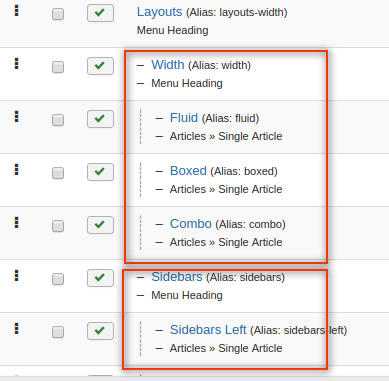
Then tick a few submenu you want to move to column and click Batch Icon(top right) then select move to - Column 1
same way you can do column 2
also you can leave some items in level 2 - all rest 2nd level items which have no child items will be 3rd column(see screenshot - column 3)
And then you should add new menu items to the correct parent item(e.g. new item-parent-column 1)
See the screenshot how it should look after
Menu Manager
Sliding Panels
Sliding Panels are the hidden container with the same name module position(for example Panel Top has the panel-top module position inside) , they are always hidden, and slide in when a user click an open button.
Pro has 4 panels from each side(top, right, left, bottom), free forks panel top only.
Alternative Blog layout(OK Blog)
Note - This option is BETA and some options can be changed/added
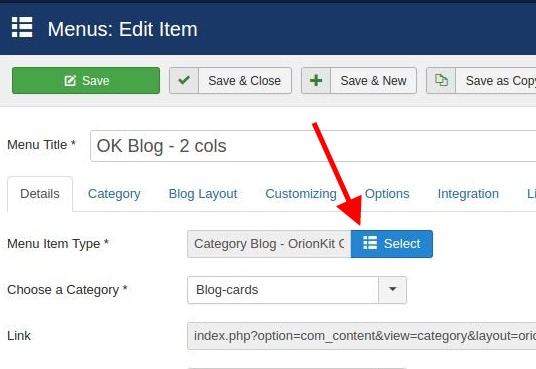
Our template has an alternative blog layout, which makes the default Joomla! blog layout as the cards.
To apply OK blog you need to change/do the menu type in the menu manager(not in the template settings) - OrionKit Blog(writing can be changed later), see the screenshots...
The rest setting are about same as it's overriding default blog with some new features.
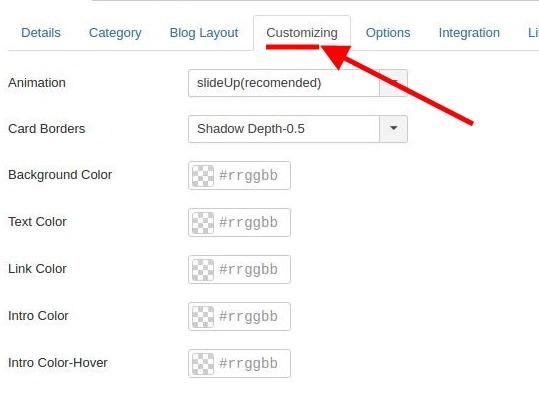
Main blog settings are in the tab 2 - Blog Layouts
There's an extra tab there, tab 3 - Customizing(Only for Pro version), where you can change the appearance of the cards(colors, borders, shadows) and ad an animation effect
How do do different styles for different pages.
For example, you want to have tamplate for inner pages with right side-bar and thin header, but want to have homepage without sidebars and content(only module sections), big header and dot navigation(home page demo - no content, sections only + dot navigation).
All you need is set template with the different styles.
- For inner pages use default style.
- Then click 'Save as copy', and call it for example 'Home'.
- Assign it on home page.
- Set as you with.
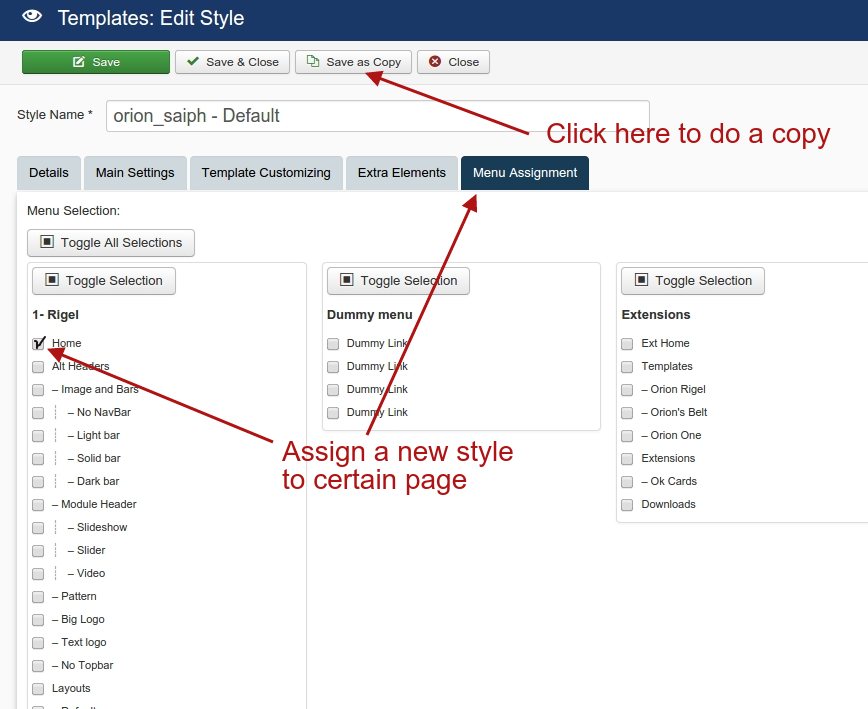
Now you have 2 different template styles 'Home' will be on home page only, 'Default' for the rest of pages.
Same way you can do as many pages(styles) as you wish - for example exept Home page and article pages you can do separate style for gallery, forum, sign up etc
See screenshot
How to update template
As every extensions the templates can have the updates, and it's better for you to update it when you get notifications. Notification you can see in the template dasboard, but as you can not enter it for long we send a newslatter as well(you should be register).
The update can be done when:
- Common update - Any bugs found and fixed
- Upgrade - we improved or added new functions
Joomla! templates can not be updated like the other extensions via Extension or Update manager.
There's 2 methods to update:
- Uninstall and install again(not recommended)
- Overwrite existing template via FTP(recommended)
1st can be done via Extension manager(Extensions > Manage > Manage and Extensions > Install), but if you use this method you will remove all your settings, and it's especially bad if you have a few styles for different pages.
2nd is simply unzip template package and upload template folder to your site > templates > template-name folder.
Also you should replace the language file, sometimes it's not necessary(bug fix update), but if it's 'upgrade version' it's better to do it, because if template has new features you will see something like this 'TPL_ORION_MINTAKA_ANIMATION' instead of text, or when nothing was added the existing text could be changed.
To replace language file you should copy the file 'en-GB.tpl_(template_name).ini' from unzipped folder template_name/language/en-GB/ to your_site_root_folder/language/en-GB/
All your settings will be saved.
Tip - Hidden test page online for testing and debugging
If you need to have a page out of the menu for no one could see it exept ones who has a direct link you can do the hidden page(for example for setting or show it to our support)
There's a few ways how to do it, but we usually do a hidden menu as when we design sites we have not the only test page, usually much more.
Method One - do the hidden menu.
1. Do a new menu, call it - hidden
2. Do new module, the type - "menu", name it "hidden" select hidden menu you did and assign to any position you like(we usually do it in the footer)
3. Important - Set access to the module(not for a menu item) "Super Users" for no one could see the menu exept you(you should be logged in)
4. Add as many test pages as you want, no one could see the menu, but all pages you have there will be online for you and if you give a direct link to anyone.
Method two - system link(quick one).
1. Add new menu item(article), call it as you wish, save it without closing and important - the menu item should be unpublished, simply switch the status to "Unpublished" before to save.
2. Copy link from "Link" field - will be something like index.php?option=com_content&view=article&id=77
url of your test page wll be your site+system link for example yoursite.com/index.php?option=com_content&view=article&id=77 This method not recomended as you can't assign modules and templates to the page/ It's for templates and components only.
Comments
RSS feed for comments to this post