(The order of filling is about fallowing: Article about most used functions first, less used ones later. Created articles have shorter description at the beginning and will be edited and expanded later. If you have any questions please leave in comments.)
Note2: The framework is in the active development and it means your version or current version can slightly differ(descriptions and esspecially screenshots)
Overview
Top Slider
Top Slider is a hidden container with module position "topslider", it's very top above header, always hidden, and slide down when a user click an open button.
What is it for?
Any kind of module you want, which should be hidden but good visible as its click button is always top center, for example, announcment, note, warning, disclaimer, login, share buttons or any other which you think is the best place for it..
This element has the fallowing features:
- 1-4 parallel modules
- customizing backgrounds of container and button
- text fields for open and close buttons
How to customize topslider.
go to Extensions > Templates > your template
Select the tab Template Customizing and click Top Slider Customizing
In this window you can change background and color, and chemge the text for open and close button.
Modules style means:
boxed - your modules will be in white box but outside background will be which you did(default is white)
Clean is - no any boxes and colors you did.
Header
Header is customizable top section which usually has such elements - Logo, Navbar, Different template elements and modules, depending on template it can be different, but the main structure is almost the same(every element is described separately, and below only about header backgrounds)
As the header section is most important part of design we did it full customizable, and you easy can change it within a couple of minutes.
Customization includes the options:
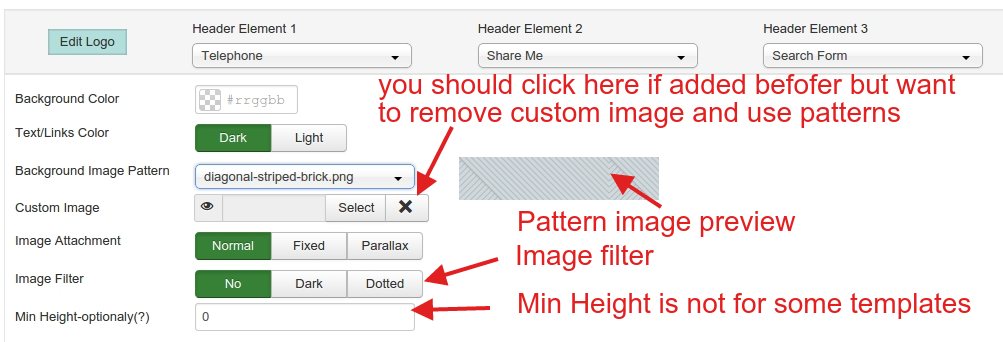
- 1.Change background color
- 2. Add preset image texure - texures are translucent and it means you can change them.
For example striped pattern with default color(for example you have result gray stripes, but if you change color to blue background will be blue stripes) - 3. You can add your own(custom) image and set its attachment.
Attacment has 3 options - normal scrolling, fixed background and parallax background - 4.Add Image filter on custom image.
Why do you need it?
Background Image can be too colorful, and text cab be bad readable(if you have modules or elements on it), if you use for example dark filter and light text it will be more contrast and good readable
Custom image usage note 1: Your image should be wide enough to cover all space of header(recomended minimal width 1920 pixels, we recommend this amazing site with hundreds of thousands of absolutely free for commercial use images, and most important their images all big enough)
Custom image usage note 2: When you use custom image template ignores preset textures(so if you after testing your own image desided to use preset patterns, don't forget to "clear" icon to remove image)
Parallax effect note: For now we use third-party script for parallax effect, it magnifies an image, so you should approximately calculate which part will be visible... we did our own script, which show the real ratio, but for now we testing it yet(will be replaced in next versions)
Screenshot with the header options
OK Elements
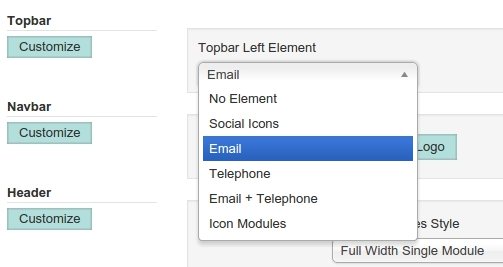
OK Elements are the different elements like an Email, Telephone etc which you can display in different parts of template, all you need is - select it in the dropdown list of the template style settings. Depending of template it can have two or more places where you can use OK Elements.
For now framework has the following elements to select:
- Telephone
- Both Email and Telephone
- Follow Us(Social Media Icons)
- Icon Modules
some more are in development...
Screenshot - selection an element to display on topbar left
Email / Phone(coming soon....)
Icon Modules
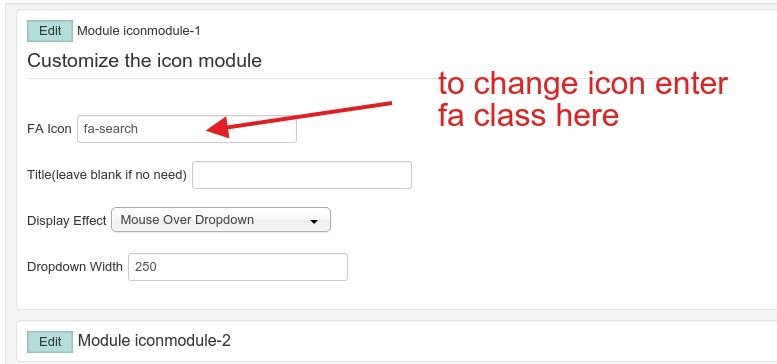
Icon module is a hidden container for module position, which can be a dropdown or modal(Pro). You should assign any module to position iconmodule-1,2,3 etc and set the view of icons.
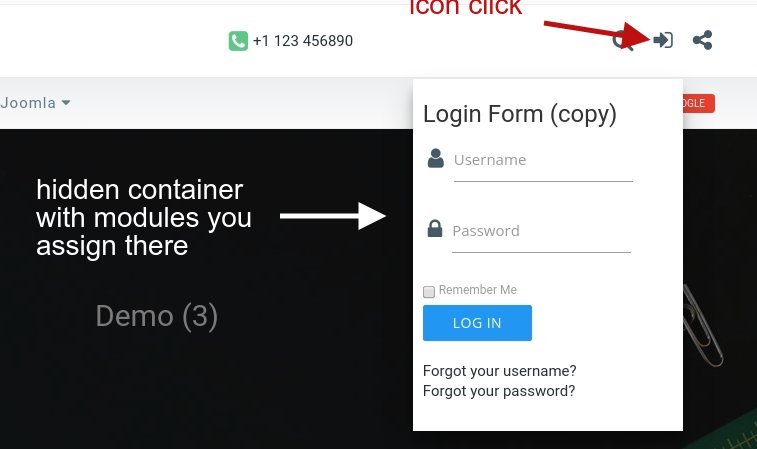
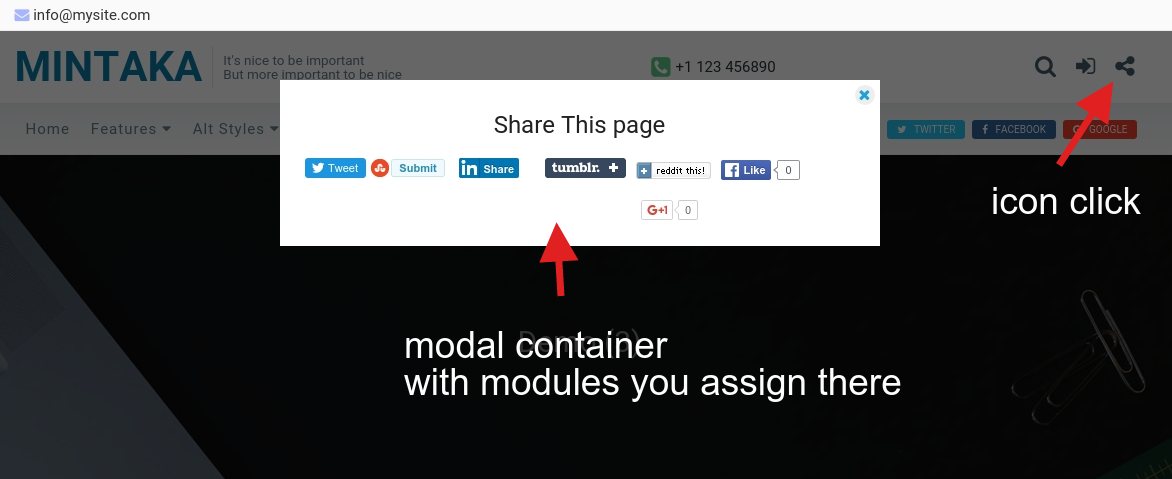
 By default we have 4 preset nodules with icons Search, Login, Share, Bars(usually means menu), but you can change icons as you wish or add more(up to 10).
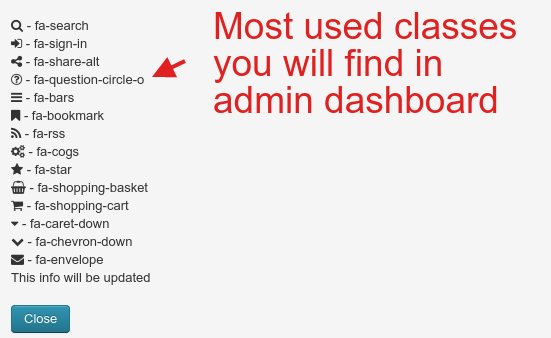
Note: if you add more icons don't forget to enter FA(Font Awesome) class or you icon will not b displayed.
Icons use the Font Awesome(fa) classes. All you need is to write down FA class into FA icon field
We didn't do it as a select list as it will be too long(it has 675 icons).
A short list of most used icons we have in dashboard(see screenshot right) - just copy/past any.
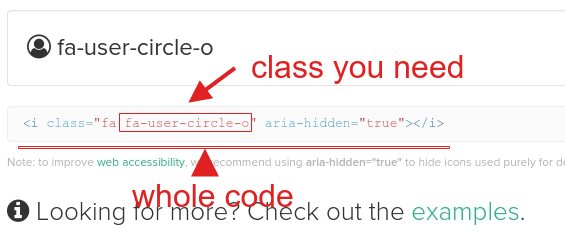
If you need more icons you should do the following steps:
- Go to official site of Font Awesome
- Click any icon you like
- Copy the FA Class
- Enter it into the field "FA Icon"
See screenshot example how to find fa class(official site of Font Awesome) - it's 2nd class in class attribute of code after "fa"
Sections(coming soon....)
How do do different styles for different pages.
For example, you want to have tamplate for inner pages with right side-bar and thin header, but want to have homepage without sidebars and content(only module sections), big header and dot navigation(home page demo - no content, sections only + dot navigation).
All you need is set template with the different styles.
- For inner pages use default style.
- Then click 'Save as copy', and call it for example 'Home'.
- Assign it on home page.
- Set as you with.
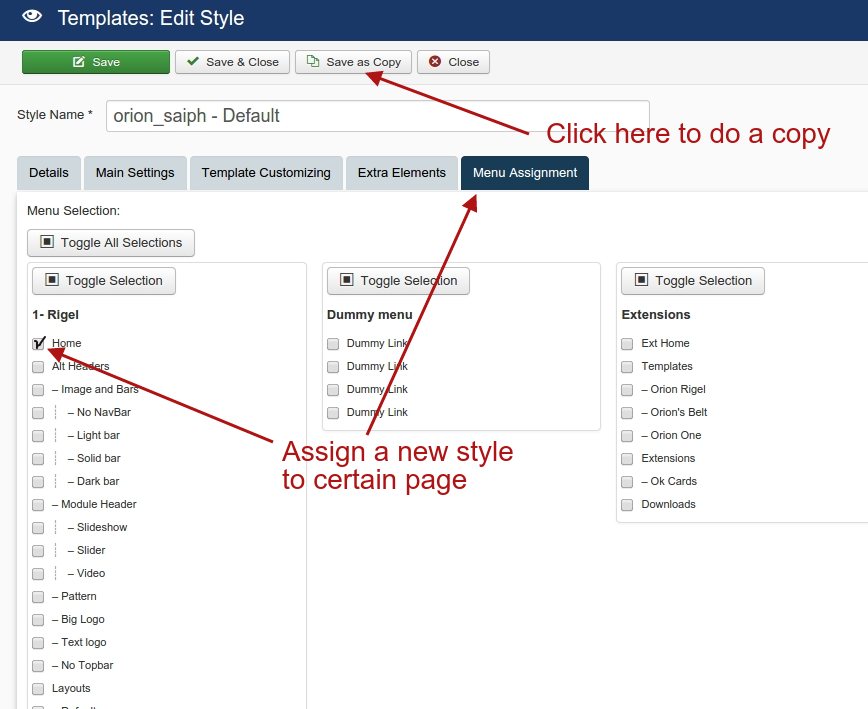
Now you have 2 different template styles 'Home' will be on home page only, 'Default' for the rest of pages.
Same way you can do as many pages(styles) as you wish - for example exept Home page and article pages you can do separate style for gallery, forum, sign up etc
See screenshot
How to update template
As every extensions the templates can have the updates, and it's better for you to update it when you get notifications. Notification you can see in the template dasboard, but as you can not enter it for long we send a newslatter as well(you should be register).
The update can be done when:
- Common update - Any bugs found and fixed
- Upgrade - we improved or added new functions
Joomla! templates can not be updated like the other extensions via Extension or Update manager.
There's 2 methods to update:
- Uninstall and install again(not recommended)
- Overwrite existing template via FTP(recommended)
1st can be done via Extension manager(Extensions > Manage > Manage and Extensions > Install), but if you use this method you will remove all your settings, and it's especially bad if you have a few styles for different pages.
2nd is simply unzip template package and upload template folder to your site > templates > template-name folder.
Also you should replace the language file, sometimes it's not necessary(bug fix update), but if it's 'upgrade version' it's better to do it, because if template has new features you will see something like this 'TPL_ORION_MINTAKA_ANIMATION' instead of text, or when nothing was added the existing text could be changed.
To replace language file you should copy the file 'en-GB.tpl_(template_name).ini' from unzipped folder template_name/language/en-GB/ to your_site_root_folder/language/en-GB/
All your settings will be saved.
Tip - Hidden test page online for testing and debugging
If you need to have a page out of the menu for no one could see it exept ones who has a direct link you can do the hidden page(for example for setting or show it to our support)
There's a few ways how to do it, but we usually do a hidden menu as when we design sites we have not the only test page, usually much more.
Method One - do the hidden menu.
1. Do a new menu, call it - hidden
2. Do new module, the type - "menu", name it "hidden" select hidden menu you did and assign to any position you like(we usually do it in the footer)
3. Important - Set access for "Super Users" not "Public" for no one could see the menu exept you(you should be logged in)
4. Add as many test pages as you want, no one could see the menu, but all pages you have there will be online for you and if you give a direct link to anyone.
Method two - system link(quick one).
1. Add new menu item(article), call it as you wish, save it without closing and important - the menu item should be unpublished, simply switch the status to "Unpublished" before to save.
2. Copy link from "Link" field - will be something like index.php?option=com_content&view=article&id=77
url of your test page wll be your site+system link for example yoursite.com/index.php?option=com_content&view=article&id=77
In both cases you can assign templates and modules to test pages for setting and debugging.
To make them active and visible then you should move menu item from hidden menu in first method or change the status to "published" in second one.
Follow Us(Social Icons)
It's a simple element where you can add links to your account in the social medea(twitter, facebook, youtube etc). It can be displayed as icons or buttons with icons and captions.
Note: Option 'display as button' you can use only if you have maximum 3 links(there's no space enough to display more - the exception is if you display it on the footer only)
Screenshot - icons only
Screenshot - buttons
First you need to add your urls in Extensions > Templates > Your_template / Extra Elements / Social
Screenshot - select option how to display and add urls
Then you can place this element in any available place(Template Customizing tab) simply select it in the list, depending of templates it can have 2-4 places.
Example - you can select it in topbar left and footer.
Screenshot - add to available place